Arrow Tuning: Bare-Shaft and Paper Tests
By James Holbert · Explained Archery
Bare-shaft tuning compares unfletched arrows with your normal fletched group. Paper tuning records how an arrow passes through a sheet of paper. Both can expose a setup problem, but neither can tell you what to adjust without knowing the bow, release style and shooting hand. Start with safe, correctly matched arrows and repeatable shots—not a wrench.
Choose the test for your setup
| Setup | Useful starting test | Important limit |
|---|---|---|
| Recurve, fingers, conventional rest | Bare shafts against a fletched group | Use the recurve impact chart below; check clearance first. |
| Compound, mechanical release | Paper test following the bow and rest manuals | A horizontal tear is not automatically a weak or stiff shaft. |
| Traditional shelf, stringwalking or unusual release | Coach-assisted test in your actual shooting configuration | Do not borrow every correction from a different setup. |
| Crossbow | Manufacturer-approved bolt and accuracy checks | This guide is not a crossbow tuning procedure. Do not fire bare crossbow bolts. |
Safety and baseline checks
- Use a controlled range, a suitable target and a backstop that can contain a poorly flying arrow. Nobody belongs between the shooting line and target.
- Inspect shafts, points and nocks using the arrow maker's procedure. Stop for damage, loose components or unexplained noise. Never dry-fire a bow.
- Use field or target points, never broadheads for these bare-shaft tests. Meet the bow manufacturer's minimum arrow mass even after removing fletching.
- Confirm safe arrow length at full draw. Select spine using the actual arrow manufacturer's chart, not tuning as a way to rescue unsuitable arrows.
- Record the starting rest position, nocking-point height and other relevant settings before touching anything. Return to that baseline if you lose track.
The spine calculator and spine chart narrow your starting choice. The test checks the resulting setup; it does not override a maker's safety limits. Have a shop resolve cam timing, damaged strings or any job requiring a bow press.
Bare-shaft tuning: recurve with finger release
Prepare matching arrows: same shaft model, spine, cut length, point and nock. A deliberately different arrow makes the comparison ambiguous. When preparing a bare shaft, do not scrape into carbon; ask a shop if unsure.
- Establish a fletched group. Start close enough to contain every arrow comfortably. A cautious first check might be at 5–10 metres; move closer if needed. This is a containment check, not the final tune.
- Compare repeated groups. Use at least two bare shafts and several fletched arrows, aimed identically. Alternate the order over several ends rather than judging one shot.
- Keep the comparison fair. Match component condition. For finer testing, have the removed rear weight replaced with securely applied, weighed low-profile tape that cannot interfere with the rest. Do not add a loose flap that acts like a vane.
- Extend only when consistent. Around 15–20 metres can reveal useful separation if your groups and backstop allow it. Never increase distance just because a chart says to.
- Adjust once, then repeat. Resolve vertical separation first for this recurve test. Record the result before trying another variable.
These consistency checks follow Easton's target-tuning advice. Avoid wind and fatigue. If the bare shafts themselves scatter widely, there is not yet a dependable tuning signal.
Read impacts relative to the fletched group
View from the shooting line toward the target. Compare where the points hit—not the angle shafts lean in the target. “Right-handed” means drawing with the right hand and holding the bow with the left.
| Bare shafts land… | Right-handed | Left-handed | Controlled next check |
|---|---|---|---|
| Above fletched group | Nocking point may be low | Test a small upward nocking-point adjustment. | |
| Below fletched group | Nocking point may be high | Check contact; test a small downward adjustment. | |
| Left of group | Stiff reaction | Weak reaction | Use the reaction checks below. |
| Right of group | Weak reaction | Stiff reaction | Use the reaction checks below. |
| Near group | Useful starting tune | Confirm normal fletched grouping. | |
A stiff reaction can respond to a heavier compatible point; a weak reaction to a lighter one. Keep arrow mass safe. Do not increase draw weight beyond your control or cut shafts below safe length to chase a result. Plunger changes are fine tuning, not a substitute for matched spine. See Easton's tuning manual, bare-shaft section.
These are hypotheses, not diagnoses. A poor release, inconsistent anchor or fletching contact can mislead you. A small residual difference may be less important than tight, repeatable fletched groups. If a large gap survives sensible checks, stop buying random point weights and have a coach or shop assess the whole setup.
Paper tuning: compound with a mechanical release
A paper tear describes the arrow's orientation at the sheet, not its eventual target impact. Follow your model's instructions: rest design, cam system and release technique all matter. Do not apply the recurve weak/stiff table to a release-aid compound.
Set up the frame safely
Use taut, thin paper in a stable frame and a rated target behind it. Leave enough clearance behind the sheet for the entire arrow to pass through before entering the target. Keep the shot level and clear of the frame. Never ask someone to hold the paper.
A common starting distance is about 4–6 feet (1.2–1.8 m) from the paper; use the distance specified by your bow maker. Shoot a fletched target-point arrow into a fresh area, then repeat. Hoyt's paper-tuning instructions illustrate this basic arrangement.
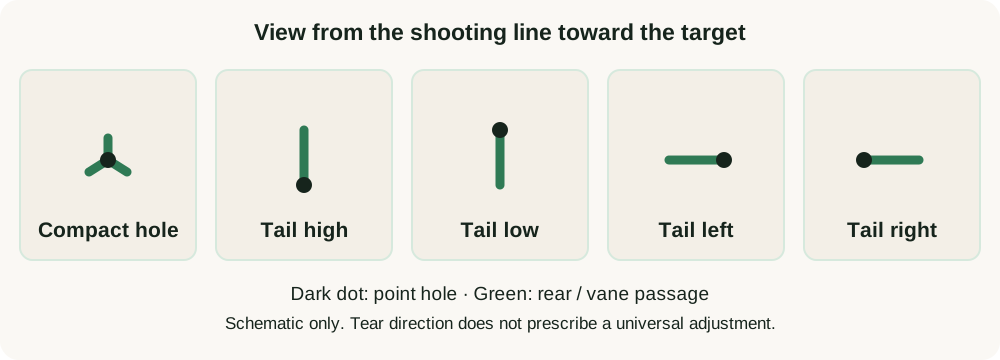
| Repeated tear | Meaning at the paper | What to check before adjusting |
|---|---|---|
| Compact point hole with vane cuts | Point and rear pass close together | Repeat, then check downrange grouping; one clean hole is not proof of a finished tune. |
| Tail high | Rear passes above point hole | Clearance, nock/rest height and cam timing. If height is the cause, your manual may call for lowering the nocking point or raising the rest. |
| Tail low | Rear passes below point hole | The same checks; a height correction may be raising the nocking point or lowering the rest. |
| Tail left | Rear passes left of point hole | Grip torque, release contact, centre-shot and model-specific lateral tuning. |
| Tail right | Rear passes right of point hole | The same checks, using the manufacturer's tail-right procedure—not a universal rest direction. |
| Diagonal | Both vertical and horizontal separation | Check contact and baseline geometry; follow your model's correction order. |
Why there is no universal “move the rest left” rule
Some bows tune through rest movement; others use cam shims or dedicated tuning hardware. For example, Hoyt's 2026 technical guide describes different XTS and HBX procedures. Its HBX cam-shim chart moves cams toward the named horizontal tail tear; that is not an instruction to move every bow's rest the same way. Cam work belongs with a suitably equipped technician.
Keep your normal relaxed grip and release execution. Do not twist the handle to manufacture a clean hole. Make only documented adjustments within the maker's limits, and have a shop recheck if correction requires extreme centre-shot, uncertain D-loop relocation or repeated unexplained changes.
When tuning will not settle
- One arrow is always different: identify it and inspect its components. Do not tune the entire bow around a damaged or mismatched shaft.
- The result changes each end: shorten the session and check anchor consistency, grip and release before moving hardware.
- Both groups move together: distinguish sight zero from the gap between groups. Sight movement alone does not eliminate that gap.
- The setup was previously stable: check loose fittings, worn components and maintenance before starting over.
Keep a useful tuning log
Record bow model, shooting hand, release style, measured draw weight, arrow specifications, test distance, group/tear pattern, one adjustment and the repeated result. Photograph paper from the same side each time. End with normal fletched groups at your usual practice distances. A tuning session succeeds when the setup is safe and repeatable, not when a single photograph looks perfect.
Common questions
Should a beginner bare-shaft tune immediately?
First establish safe arrow fit and a repeatable fletched group. If shot variation hides the difference between groups, coaching is more useful than fine tuning.
Can I bare-shaft tune a compound bow?
Experienced compound archers can use bare shafts, but the recurve finger-release interpretation here does not transfer directly. Start with your compound manufacturer's procedure and qualified setup help.
Does a perfect paper hole guarantee accuracy?
No. It describes one passage through the paper. Repeat the test and verify fletched grouping downrange under normal shooting conditions.
Should I tune with broadheads?
Not with unfletched arrows in these tests. Hunting-point verification is a separate, manufacturer-guided task after safe field-point setup and requires an appropriate target.
See also: Best Arrows for Beginners.