How to String a Recurve Bow
This guide contains affiliate links. As an Amazon Associate I earn from qualifying purchases. How affiliate links work.
By James Holbert · Explained Archery
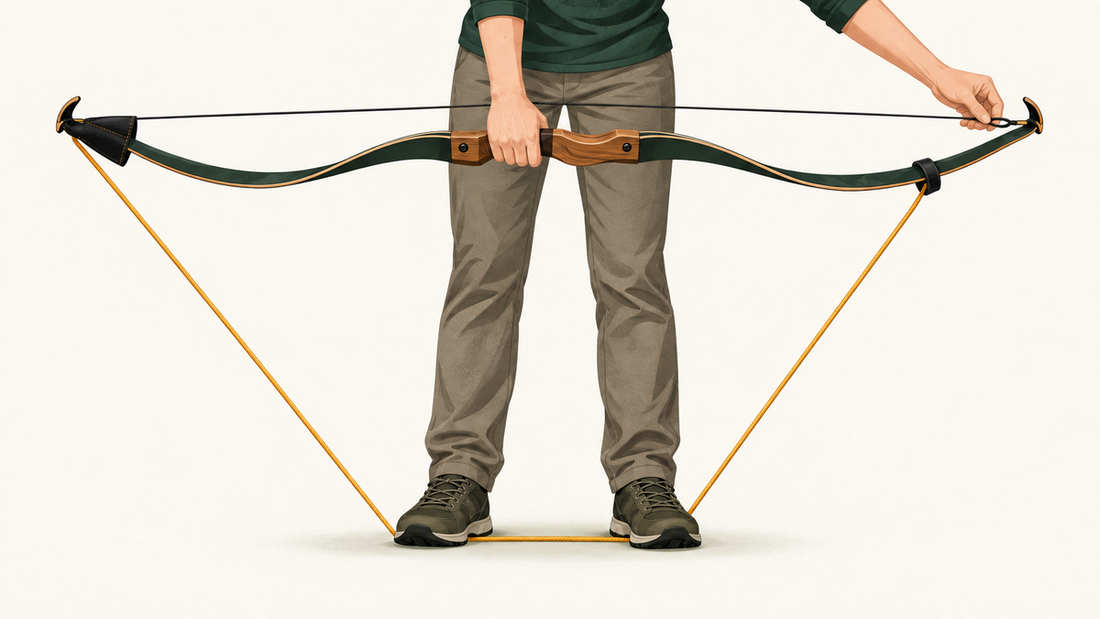
To string a recurve bow, slide the larger string loop over the upper limb and down toward the riser, seat the smaller loop in the lower limb tip groove, fit a bow stringer over both limb tips, step on the cord, lift the riser until the limbs flex, and slide the top loop up into its groove. Lower the bow slowly, check that both loops sit fully in their grooves, and check brace height before you shoot. You can string a recurve bow without a stringer, but the step-through and push-pull methods twist limbs and put a limb tip close to your face, which is why almost every bow maker tells you to use a stringer.
Quick answer
A bow stringer is a cord with a pocket or saddle at each end. It holds the limbs flexed so your hands are free to move the string. The short version:
- Small loop in the bottom groove, large loop loose on the top limb.
- Stringer pocket over the bottom tip, pocket or saddle on the top limb.
- Step on the cord, lift the riser, slide the large loop into the top groove.
- Lower the bow, remove the stringer, check both loops and the brace height.
Need to take the string off instead? Read how to unstring a recurve bow. Choosing your first recurve? The start archery hub and the bows hub cover bow length, draw weight, and what to buy with it.
What do you need to string a recurve bow?
The bow, a string that fits it, and a stringer. Nothing else.
A bow stringer
A double pocket stringer has a cup at each end that slips over each limb tip. A pocket and saddle stringer has a cup for the bottom tip and a flat rubber block that sits on the face of the upper limb below the tip. Both work on nearly every recurve. Takedown makers usually ship the pocket and saddle type. A stringer costs less than a replacement limb, so buy one with the bow.
The right string, larger loop on top
A recurve string has two loops of different sizes. The larger loop goes on the upper limb so it can slide down the limb while you string and unstring. The smaller loop goes on the lower limb and stays in its groove. A recurve string is normally 3 to 4 inches shorter than the bow's marked AMO length, so a 68 inch bow usually takes a 64 or 65 inch string. Check the maker's spec, because a few bows run outside that rule. The recurve string measuring guide shows how to check an old string, and the bow length guide explains where the AMO length comes from if your riser has no label.
Which limb is the top limb?
Takedown limbs are usually marked "upper" and "lower" near the limb bolt, and the draw weight sticker is normally on the lower limb. On a one-piece bow, hold it as if to shoot: the arrow shelf sits above the grip, so the limb above the shelf is the upper limb. Sight and stabilizer bushings also sit on the upper half of the riser.
How to string a recurve bow with a stringer
These steps assume a pocket and saddle stringer. With a double pocket stringer, the top pocket goes over the top tip, above the string loop, instead of the saddle resting on the limb face.
How do you know a recurve is strung correctly?
Do these four checks every time you string the bow.
- Both loops are fully seated. Each loop sits in the groove on both edges of the tip. A loop on one edge only can jump off at full draw.
- The string runs down the center of both limbs. Hold the bow at arm's length, string toward you, and sight from tip to tip. The string should track down the middle of each limb and through the center of the riser. If it sits to one side, the loop is off center or the limb is twisted.
- The string is on the belly side. The tips curve away from you and the string lies on the side facing you. A recurve strung backwards bends the limbs the wrong way and can crack them.
- Brace height is in the maker's range. Measure from the deepest part of the grip to the string. Use the table below as a starting point.
If the string sits off center and the loops are seated, do not shoot. Unstring and lay each limb on a flat surface to look for twist. A shop can usually correct a mild twist.
How to check brace height and twist the string
Brace height is the distance from the string to the pivot point of the grip on a strung bow at rest. Too low and the string slaps your forearm and the bow is noisy. Too high and the bow feels stiff and loses a little speed. Measure it with a bow square or a tape held against the grip.
Typical ranges run from about 7.5 inches on a 58-inch bow to 9.5 inches on a 70-inch bow, longer bows sitting higher. The full chart by bow length, and the method for tuning inside that range, is on the recurve brace height chart.
To change brace height you twist the string: more twists shorten it and raise brace height, three to five twists moving it about an eighth of an inch. Needing more than roughly 20 to 25 twists means the string is the wrong length, which measuring a recurve bow string covers. A new string also stretches over its first hundred arrows, so expect to add a twist or two.
Can you string a recurve bow without a stringer?
Yes, and it is how most twisted limbs and a fair number of facial injuries happen. Hand methods load the limb through one edge, which can twist it, and a twisted limb throws arrows off line and can fail. Your face is also close to a limb tip under load, and a slipped loop lets that tip spring back at you. Many recurve warranties exclude damage from stringing without a stringer. If you have to, these are the two methods.
Step-through method
Seat the small loop in the bottom groove. With the string toward you, step through between the string and the riser with one leg. Hook the lower limb across the front of your ankle with the tip outside your foot, and rest the riser against the back of your thigh. Pull the upper limb tip toward you with your bow hand while your other hand slides the large loop into the groove. Pull straight along the limb, never sideways. Sideways force is what twists limbs.
Push-pull method
Seat the small loop. Brace the lower tip against the inside of your foot on the floor. Pull the riser toward you with one hand while the other pushes the upper tip away and slides the loop into place. Your face is directly above the tip in this method, which is why many coaches refuse to teach it.
A hand method is a reasonable emergency choice for a bow of roughly 30 pounds or less, or a cheap fiberglass youth bow. For laminated or carbon limbs, or any bow you care about, buy a stringer.
Stringing a takedown recurve vs a one-piece recurve
The stringer steps are the same. The difference is what comes before them.
- Takedown: fit the limbs first. Bolt-down limbs slide onto the limb bolt and alignment pin and tighten until the limb sits flat on the pad; ILF limbs push into the dovetail until the detent clicks. Upper limb on the upper end of the riser. Check neither limb rocks side to side, then string. Sighting down the string is also your limb alignment check, and it should be repeated whenever you turn the limb bolts. The draw weight guide explains how limb bolts change the number on the scale.
- One-piece: no assembly, so the only decision is which end is up. One-piece bows are more often wood, and those should be unstrung after every session. Some traditional bows have a groove only on the tip, so seat the top loop with care.
How often should you string and unstring a recurve?
String it when you shoot and unstring it when you are done for the day, unless you shoot again tomorrow. Modern limbs with fiberglass or carbon over a wood or foam core can stay strung for days or weeks without measurable loss. Wood limbs and self bows take a set, meaning they lose draw weight and cast if left braced, so they come off the string after every session. Every stringing cycle is also a small chance to nick a loop or twist a limb, so do not cycle the bow more than the day needs. Unstring for travel, for storage longer than a couple of weeks, and before the bow goes in a hot car. The unstringing guide has a strung versus unstrung storage table by limb type.
After stringing, do not draw and let go to "test" the bow. Releasing with no arrow is a dry fire, which sends the limbs' full energy into the bow instead of an arrow. The dry fire guide explains why this cracks limbs on any bow type. Nock an arrow and shoot into a target, or draw and let down slowly.
Common recurve stringing mistakes
| Mistake | What happens | Fix |
|---|---|---|
| Large loop on the bottom limb | The small loop will not slide on the upper limb and the bottom loop sits loose. | Unstring and swap ends. Large loop on top. |
| Loop seated on one edge only | The string can jump off the tip at full draw. | Feel both edges of each groove before you release the stringer. |
| Stringer pocket not fully on the tip | The pocket slips under load and the limb snaps back toward you. | Push each pocket on until it stops. Center the saddle. Lift smoothly. |
| Pulling sideways in a step-through | The limb twists. The string sits off center and arrows go left or right. | Use a stringer. Have a shop check a twisted limb before shooting. |
| String on the back of the bow | The bow is strung backwards and the limbs can crack. | Tips curve away from you, string on the side facing you. |
| Brace height too low or too high | Low: forearm slap and noise. High: a stiff, slow bow. | Add or remove twists, three to five at a time, and measure again. |
| Dry firing to "hear" the string | Limb or riser damage on the first shot with no arrow. | Only release the string with an arrow on it. |
Most of these show up on the first shot, which is why the four checks above come before the first arrow.
Before you string a recurve, every time
- Inspect limb tips, grooves, and string loops for cracks, splits, or fraying.
- Keep your face out of line with the limb tips while the limbs are flexed on the stringer.
- Seat each stringer pocket fully before you lift. Lift smoothly, never with a jerk.
- Confirm both loops are in their grooves on both edges before the stringer goes slack.
- Never draw and release without an arrow, and never draw a bow toward another person.
A stringer is the cheapest piece of archery gear you own and the one most likely to save a limb, or your eye.
Related guides
Once the bow is strung, these guides cover the next things a new recurve archer runs into.
Frequently asked questions
Short answers to the questions people ask most about stringing a recurve.
How do you string a recurve bow without a stringer?
Seat the small loop in the bottom groove, step through between the string and riser, hook the lower limb across your ankle with the riser behind your thigh, bend the upper limb forward with your bow hand, and slide the large loop into the top groove. Pull straight along the limb and keep your face away from the tip. Most makers void limb warranties for damage caused this way.
Which string loop goes on top of a recurve bow?
The larger loop goes on the upper limb, because it has to slide up and down the limb during stringing. The smaller loop sits in the lower limb groove and stays there.
How do I know my recurve bow is strung correctly?
Both loops sit in their grooves on both edges, the string runs straight down the center of each limb when you sight along it, the tips curve away from you with the string on your side, and the brace height is inside the maker's range.
What brace height should a recurve bow have?
Most recurves sit between 7.5 and 9.5 inches depending on length. A 66 inch bow is usually 8.25 to 9 inches and a 68 inch bow 8.5 to 9.25 inches. Adjust with string twists: more twists raise it, fewer lower it.
Can I leave my recurve bow strung?
Modern laminated limbs can stay strung between sessions for days or a few weeks without harm. Wood limbs and one-piece wood bows should be unstrung after every session. Unstring any bow for travel, hot cars, or storage longer than a couple of weeks.
Why does the string keep slipping off the limb tip?
Usually the loops are on the wrong limbs, a loop is seated on one edge only, or the string is too long so the loop sits loose. Check the loops are the right way round, seat each on both edges, then check string length against the bow.
References
These sources support the guidance on this page.